The original idea suggested by Professor Rus was the four wheel independent drive ``Mobipulator.'' A group at Carnegie Mellon (I will insert a link here when available) built the mobipulator and produced some neat results. However, I was concerned that a mobipulator-style configuration wouldn't be able to reliably pick a single sheet of paper from a stack, or reliably deposit a sheet of paper onto a stack. Because it operates by sliding the paper, it might try to slide the sheet it is manipulating between two sheets in the stack.
So I came up with a few paper-grabbing ideas. One idea was to use a mobipulator to pinch the paper, then grab the lifted edge with a pincer. Another idea was to grab the paper using suction. The idea I settled on was to grab paper using a sticky surface, with stickiness supplied by a reel of removable tape. Removable tape has adhesive properties very similar to those of a Post-It Note.
![]() I modeled the robot a few times in lego. The main feature is a cam arrangement
that uses the rear wheels to help the tape detach. The cam gives me motion
in two axes with only one actuator.
I modeled the robot a few times in lego. The main feature is a cam arrangement
that uses the rear wheels to help the tape detach. The cam gives me motion
in two axes with only one actuator.
![]() Here is an image of the CAD model of my robot, before it was built.
It was produced in Pro/Engineer. The metal parts were modeled based on
descriptions in the Allied small parts catalog. In the model, there
are 13 custom plastic parts, three custom metal parts fabricated in the
Thayer School machine shop, and a handful of modifications to Allied
gears performed in the machine shop.
(Thanks to Marty Vona, Pete Fontaine, and Keith Broughton for their help in the
shop and with the rapid prototyper that produced the plastic parts.)
Here is an image of the CAD model of my robot, before it was built.
It was produced in Pro/Engineer. The metal parts were modeled based on
descriptions in the Allied small parts catalog. In the model, there
are 13 custom plastic parts, three custom metal parts fabricated in the
Thayer School machine shop, and a handful of modifications to Allied
gears performed in the machine shop.
(Thanks to Marty Vona, Pete Fontaine, and Keith Broughton for their help in the
shop and with the rapid prototyper that produced the plastic parts.)
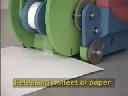
![]() Here are some animated photos of the manufactured mechanism, showing
most of its degrees of freedom. A 3Com Palm III personal organizer
is shown mounted in the robot chassis, although the electronics were
not complete at the time these photos were taken. For the photos, actuators
were operated by directly connecting batteries to the motor leads.
Here are some animated photos of the manufactured mechanism, showing
most of its degrees of freedom. A 3Com Palm III personal organizer
is shown mounted in the robot chassis, although the electronics were
not complete at the time these photos were taken. For the photos, actuators
were operated by directly connecting batteries to the motor leads.
![]() This page describes the software and electronics configuration of the robot.
It includes schematics and a circuit board layout.
This page describes the software and electronics configuration of the robot.
It includes schematics and a circuit board layout.
 This page has links to some video footage of the robot.
![]() This page gives the source code for the Palm III and PIC processors that
run on-board Fiat, and shows a screen-dump of the Palm III interface.
This page gives the source code for the Palm III and PIC processors that
run on-board Fiat, and shows a screen-dump of the Palm III interface.
![]() This page has links to our ISER '99 paper that includes a discussion of
Fiat.
This page has links to our ISER '99 paper that includes a discussion of
Fiat.
 This page describes some experiments that measured the performance of Fiat.