|
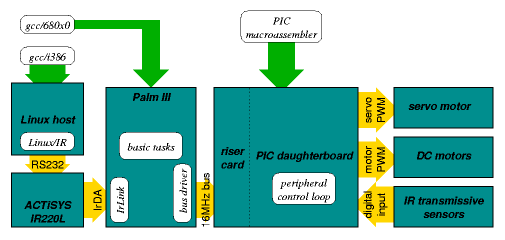
| Linux host. Communicating with the robot begins on a linux host computer. I am running IrDA stack from Dag Brattli and others. |
|
|
ACTiSYS IR220L.
The linux box has an ACTiSYS IR220L dongle plugged into its serial port,
which modulates a serial signal into an IrDA beam. ACTiSYS, and especially
their engineer Lichen Wang, was extremely cooperative in helping the
Linux/IR folks write a driver for their dongle -- I made one phone call
to ACTiSYS, got the information from Lichen, posted it to the Linux/IR
mailing list, and Dag had added driver support within two days.
Note, however, that the ACTiSYS dongle won't work on a Macintosh, because the mac serial ports have only one line to serve as RTS or DTR, and the dongle requires both. |
|
| IrLink. To communicate with the PalmIII via IR, I was doing some experiments based on IS/Complete's IrLink. IrLink is "trialware," and costs $20 to register. I may try my hand at my own IR code; I hope the PalmOS includes IrDA libraries. |
|
| Palm III. The brain of the robot is a 3Com Palm III personal organizer, which is based on a Motorola DragonBall (68328) processor. The DragonBall is a microcontroller version of the 68020. A microcontroller is a processor that includes several I/O support components on-chip, so that devices need fewer external components. The Palm III uses most of the I/O built into the DragonBall. |
|
| basic tasks and bus driver. The code running on the Palm III includes a bus driver that communicates with the low-level I/O control on the PIC daughterboard. The basic tasks performed on the Palm III include trapezoidal motor control (slow ramp-up and ramp-down of motor power), speed and position tracking and control, and operation of the cam and tape winding assemblies. The user-interface includes functions that combine these primitives into test sequences that pick up a sheet of paper, navigate on the desk, and deposit the paper. |
|
| gcc/680x0. There is a gcc development environment for the Palm III that I use under linux to build the Palm III driver application. |
|
| PIC peripheral control loop. The code running on the Microchip is very simple. It polls the asynchronous parallel port to see if the Palm III has written data to it or read data from it. The protocol is for the Palm III to write a PIC address (8 bits), then either read out the value at that address in the PIC's memory space, or write a second value, which the control loop writes to the given address. This lets the Palm III read or write any RAM location in the PIC remotely, including I/O registers. This way, it can remotely control most I/O devices. The control loop also generates a precise PWM signal for the steering servo, and runs a state machine to track the quadrature shaft encoder's motion; these operations are done directly on the PIC because they are very time-sensitive. |
| PIC daughterboard. I couldn't directly use the DragonBall's I/O pins for robot control, for two reasons: First, the Palm III already uses most of them; and second, the pins are inaccessibly small and I didn't want to risk damaging the Palm III. Instead, I built a memory-mapped I/O board based on the Microchip PIC 16C74A. The 16C74 series has a slave parallel port that can be mapped onto the bus of the 68328. |
|
| There were a few challenges in interfacing the PIC to the Palm III. First, the Palm III components run on 3.3 volts, but the PIC requires 5 volts. I solved this problem using a Pericom PI74LPT245AQ octal bidirectional transciever from Digikey. This Pericom transciever is 3.3V logic with 5 volt tolerant I/O, meaning it can accept 5V inputs. Unfortunately, the chip was only available in QSOP (0.025" spacing), which won't be fun to solder. |
|
|
The second challenge was phyically connecting to the Palm III's bus.
The memory card pinout is available via a link at left. But the
connector is tricky. Apparently this connector is a standard Small Outline
DIMM connector. It has 72 card-edge pads on a 0.031" think board. Pads
on each side are on 0.050" centers; the pads on the bottom side (even
numbered pins) are offset by 0.025". The connector on the Palm III is
an HRS SX1B-72S-0.635H from Hirose Electric. It was a trick to figure this out;
I ended up photocopying the Palm III board and faxing the image to a helpful
person at Hirose who was able to identify the connector. The 'B' in
the part number can be
'B', 'C', or 'E'; the difference is how high the card sits above the main
board.
These connectors also have 0.025"-spaced pins, which will be difficult
to solder.
Although I list Hirose's website at left, I could not find the connector on their site. A Hirose telephone rep referred me to Schuster electronics, who they said had recently purchased a batch of the connectors. Schuster (1-800-521-1358) sold me seven of the connectors to meet their minimum order of $25. |
|
|
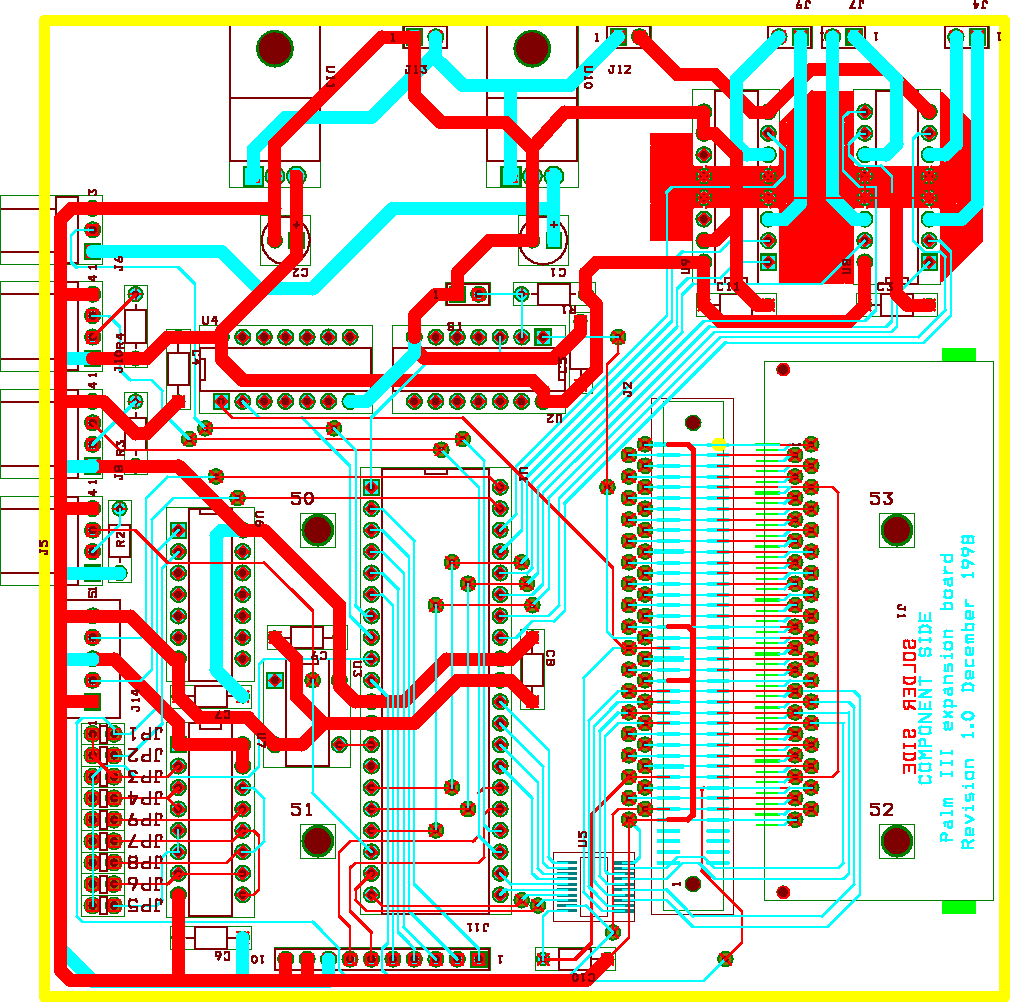
riser card.
I built a riser card (0.031" thick) that plugs into the Palm III RAM
slot in place of the Palm III RAM card, with an 80-pin HRS FX2-80P-1.27SV
vertical socket (available
from Digikey). (Eight pins are not connected.) The corresponding plug
is mounted on the back side of my PIC daughterboard (a standard 0.062"-thick
board). The daughterboard
has the HRS SX1B-72S-0.635H connector on the front (where the original Palm III RAM
card is installed), and all of my supporting electronics.
The boards were manufactured by Alberta Printed Circuits. Because of the nonstandard thickness of the boards, I had to have sixty of the riser cards made. I also have spare HRS SX1B-72S-0.635H connectors. If you'd like to expand a Palm III, I'd be happy to sell you one or two of these little guys. |
board information.
Definitions of the connectors on the board, starting with jumper block and
moving counterclockwise around board perimeter:
| |
|
20/20 hindsight.
| |