jonh :
robots :
position-encoding
An absolute position-encoding scheme
After working with Serial Killer, Keith Kotay and I decided that I had
spent way too much time just trying to help my robot find his place in
the world, and that many experiments might be more productive if we
could reduce the problem by eliminating positional uncertainty.
Our idea was to somehow print a pattern on the floor of the robots'
environment.
We were considering printing a pattern on large electrostatic
plotters and sticking the sheets to the floor of our lab. Then robots
that wanted to navigate the system would have a low-resolution black and
white video camera pointed at the floor. From any position in the room,
the robot should be able to capture a video frame and compute its
position and orientation.
Keith began looking into this problem by trying to generate fields of
black and white cells with the property that a given section of the image
would be unique with respect to any translation. He wrote a program
to generate the field in a brute-force way, by generating new random bits
and checking each against every existing bit pattern, but
that turned out to be pretty slow. (It may be more feasible with more
thoughtful data structures, however.)
 Keith described his approach to me around April of 1997, while I was taking
an course on image warping.
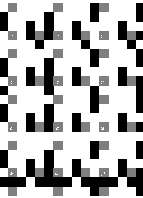
I came up with an alternative plan that required three colors: black and
white for the data channel, and grey for a control channel.
In the sample system at left, the ternary cells are arranged
into 5x5 super-cells. Three of the cells are grey control bits, sixteen are
black or white data bits, and six are unused (always white).
Eight data bits are used for the x dimension, and eight for y.
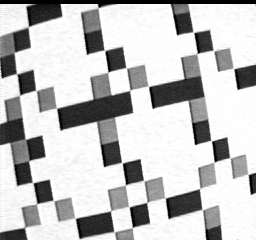 Here is how a video frame is analyzed to determine the camera's (and hence
the robot's) position and orientation. At left is a video snapshot of a printed
section of the pattern, taken by Clyde from the Dartmouth Robotics Laboratory.
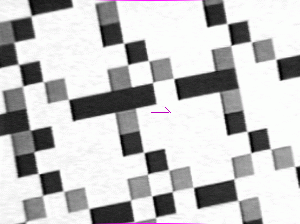 First, artifacts from the capturing process are removed. The black band
at the top of the image is cropped, and image is widened to
correct the aspect ratio (so that squares in the pattern appear as squares in
the image). Barrel distortion is a common artifact of cheap wide-angle lenses,
it causes features at the edge of the image to appear smaller than identical
features at the center. This distortion is removed, leaving a resulting
image (at left) that appears flat.
Each pixel value in the image is threshholded to one of the
three possible values white, grey, or black. (not shown)
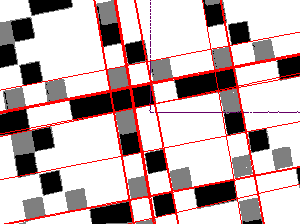
The purple vector at the center of the image is the point and orientation
whose absolute (world-space) coordinates the algorithm will determine.
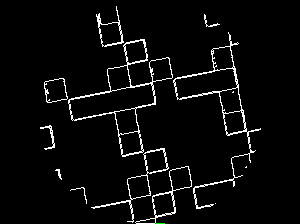 The image is then run through an edge-detection convolution (filter) that
highlights edges of sharp contrast. The edge-detected image is cropped
to a circle so that no orientation of line has a disproportionate contribution
to the next step.
 A Hough transform
maps the points in the edge-detected image into a
dual space in which each point represents a line in the original image.
The brightest points in the Hough map correspond to the lines in the
original image that pass through the most edge-detected points.
The result is a set of equations for lines (rather than just pixels
that look like lines to the human eye). These are drawn in over the
image at left.
The slope of the lines tell us how far we are rotated from one of
the four axes (or compass points); the nearest line intersection is
used to discover the boundaries between the squares.
 Both corrections (the rotational correction between 0 and 90 degrees, and the
translational correction to put the corner of a square at the origin) are
applied to the image, and their effect stored in a matrix so we can
later recover the original position of the camera.
The image at left is an 80 degree counterclockwise rotation of the previous
image.
At this point, we have found a five-by-five set of cells in
the image, and we know our position relative to those cells. The centers
of each cell is averaged and threshholded to determine the cell's color. The
red bars show the parts of the image that are discarded to avoid color
slopping in from a neighboring cell.
The control (grey) bits uniquely identify the orientation of the image.
In a canonically oriented supercell, Control
bits are interleaved with data bits this way:
ddddd
Cdddd
ddddd
ddddd
CddCd
The lower-left control bit is called the "base."
The control bits are tiled uniformly across the floor pattern, and so
we can pretend that the control bits in the image wrap around the
edges of the image; that is, we can do pixel math modulo 5.
At any orientation, the base control bit is the only one with the property
that two control bits appear at
base+[3,0]T
and
base+[0,3]T. This test identifies the lower-left bit in the image
above as the control bit, and further indicates that the image is 180 degrees
rotated from the canonical orientation. This rotational correction is applied
(and stored for later), giving this new 5x5 set of cells:
---#-
---#-
-#C#C
#--#-
----C
We know that the upper-right C is the base
control bit, and so we are actually looking at the junction of four
supercells:
---#
---#
-#C# |
-
-
C |
#--#
---- |
-
C |
y3 y2 x7 y1 y0
C     x6    x2
y7 y6 x5 y5 y4
      x4    x1
C     x3 C  x0
|
Now we must explain how the data bits are laid out in a supercell.
The x bits occupy two rows of the supercell, and the y
bits occupy two
columns. The most significant bits of the x value run down the
center of a supercell, and the most significant bits of the y value
run across the center.
The least significant bits run across the top row and down the right column.
y6=0 x5=0 y5=0 y4=1
.... x4=0 .... x1=1
.... x3=1 .C.. x0=1
|
y7=0
....
.C..
|
y2=1 x7=0 y1=0 y0=1
.... x6=0 .... x2=0
|
y3=0
.C..
|
In any 5x5 view of the floor pattern, we will be able to see at least
nine cells of some supercell. Our image is represented again at left
with the names of the data bits in place; the upper-left supercell is
the most visible one, so we will take that one to be the position
we wish to extract.
Because x values run down columns, x7 and x6 that
we can see in the neighboring cell below must be the same as those in
our target cell that we can't see (because they would appear above
x5). Likewise, x2 from the cell below corresponds with
x1 and x0. Since both columns of x bits run through
our target cell, we can simply concatenate them together into an eight-bit
value that gives the x-coordinate of this supercell as
000010112 = 1110.
The y-coordinate is a bit trickier. Again, y7 from the
neighboring supercell to the right can still be used, because that supercell
has the same y-coordinate. But the least-significant y bits
appear in the supercells in the row below. Therefore, we extract
y3|y2|y1|y0, add one and bitwise-AND with 0x0f to figure
out what the LSB y bits would be in our target cell if we could
see them. In this case, y3..y0 for our target cell should
be 01012 + 1 mod 1 = 01102. Combined with the most
significant bits, we arrive at a y-coordinate of
000101102 = 2210.
Cells in this implementation are 1cm x 1cm, so the supercell at (11,22)
is at (55,110) centimeters from the origin. We add (1,-2) centimeters to
account for the fact that our view was not centered over the supercell,
but over a point 1 cell to the right and 2 cells below center.
During this process, we have composed a single matrix which accounts for
all of the transformations made to the image or detected within it:
- Rotation to orient the cells orthogonal to the image's axes.
- Translation (generally less than one cell) to align the cell boundaries
with the boundary of the image.
- A 0, 90, 180, or 270 degree rotation to orient the control cells
canonically.
- Translation by up to 4 integral cells (centimeters) to account for
the base control cell not being in the lower-left corner of the view.
- Translation by multiples of 5 cells (supercells, 5cm) to account for
the address encoded in the measured supercell.
The resulting SE(2) transformation absolutely describes the robot's position
and orientation in the world.
Notice that the resolution is indeed finer than one centimeter;
as a result of the second translation, it is limited only by the resolution
of the camera and the success of the hough transform at correctly detecting
lines in the image.
Extensions
Although the photos above are genuine snapshots of the working system,
we never built a whole floor out of this stuff for use in the lab as
a substrate for other experiments. However, we thought of some extensions
that might be interesting. Those with links are ones that have been
completed.
- Two-level bits
-
Another interesting improvement would be to eliminate the grey control
cells, encoding their information in the same black and white bits used
for data.
- Bigger coordinate space
-
The first obvious extension would be to increase the number of data
bits available, perhaps by using the six unused cells, or by increasing
the size of a supercell. The current system is limited to a space
256 x 5 = 1280 cm = 12.8 m on a side. Of course, one could use larger
cells, but this would increase the amount of free space that must be visible
on the "camera side" of the robot in order to capture the requisite 5-cell
square. (More accurately, the camera must capture a 5*sqrt(2)-cell-diameter
circle.)
- Error-check bits
-
Another use for the left-over cells in a supercell would be to store
error-checking bits. A digital error-check would protect against
mistakes in the long chain of image transformations.
- No camera
-
It would be nice to reduce the hardware requirements for this system.
One approach would be to use a strip of eleven reflective optical sensors
spaced 1/2 cell apart, and sample them every
1/2-cell using the robot's shaft encoders to measure
local forward motion. The Nyquist limit suggests that this should be
enough samples to recover a usuable image. However, we may
need more clever tricks to recover rotational information. Perhaps we could
record far more samples in the rolling dimension, increasing our
resolution enough in that dimension to infer the slopes of lines the
robot crosses at an angle.
- Spread spectrum
-
I don't know much about it, but it seems like a way to
- get error checking and correction,
- use only two-level bits, and
- potentially reduce the number of input pixels to one.
Imagine that (x,y)-tuples are encoded in rows in one ``image'',
and in columns in another. A third and fourth image each encode a
strictly-increasing signal along the x and y
dimensions, respectively. All four signals also have a ``color'' encoded
alongside their data bits. The floor image is the sum of all four
channels. (I'm not sure whether this sum can be done in a two-level image,
but it would seem so.)
Now, a sufficiently-long line segment of any orientation will read at
least one (x,y)-tuple channel, and at least one
strictly-increasing signal. The tuple directly communicates the robot's
position. The arctangent of the relative ``lengths'' of the two
increasing signal channels gives the angle of the line segment's path.
That line-segment could be provided by an input device as simple as
a single reflective optical sensor, perhaps using the robots' wheel
shaft encoders to more easily normalize the signal.
- Less instrusive environment modifications
- The previous item dealt with how to reduce the on-robot requirements;
here we consider ways to reduce the enviroment requirements; that is,
alternatives to printing a pattern to cover the entire floor of the
laboratory.
- Tileability.
One complaint is that we can't just sell one kind of
floor tile to install repeatedly. I see no obvious way around this
problem, since any repeating tile necessarily contains no locally-visible,
globally-unique information. One could imagine a specific arrangement
of a small set of tiles, but in the limit this is simply our specific
arrangement of three very small tiles (black, grey, and white).
- Projection.
One possibility is to project the pattern onto the
floor, a wall, or the ceiling using infrared light, and pick it up
using a CCD camera with an infrared-pass filter. We would need to deal
with shadows (the robot's own shadow could interfere with a floor
projection) and occlusion (the light fixtures could interfere with a
ceiling projection). Perhaps we could project the image onto the
floor, and have a single, upward-pointing sensor on the robot pick up
the projected image as the robot moves, as described in the spread
spectrum section.
- Stochastic labels.
Another approach would be to supply the ``customer'' with a big stack of
labels, each with a spread-spectrum tile. These would be stuck to the
floor at random intervals. A robot would get an absolute fix whenever
it happened to pass over a label; it would use dead-reckoning in between
labels. If it became disoriented, it would use a wall-following or
space-filling strategy to attempt to cover ground until it passed over
a label.
An initial calibration would be required to establish known positions and
orientations for each of the labels.
Another advantage of this approach is that damage to the floor is
trivially repaired: stick down a new sticker, and calibrate it.
 Keith described his approach to me around April of 1997, while I was taking
an course on image warping.
I came up with an alternative plan that required three colors: black and
white for the data channel, and grey for a control channel.
In the sample system at left, the ternary cells are arranged
into 5x5 super-cells. Three of the cells are grey control bits, sixteen are
black or white data bits, and six are unused (always white).
Eight data bits are used for the x dimension, and eight for y.
 Here is how a video frame is analyzed to determine the camera's (and hence
the robot's) position and orientation. At left is a video snapshot of a printed
section of the pattern, taken by Clyde from the Dartmouth Robotics Laboratory.
 First, artifacts from the capturing process are removed. The black band
at the top of the image is cropped, and image is widened to
correct the aspect ratio (so that squares in the pattern appear as squares in
the image). Barrel distortion is a common artifact of cheap wide-angle lenses,
it causes features at the edge of the image to appear smaller than identical
features at the center. This distortion is removed, leaving a resulting
image (at left) that appears flat.
Each pixel value in the image is threshholded to one of the
three possible values white, grey, or black. (not shown)
 The image is then run through an edge-detection convolution (filter) that
highlights edges of sharp contrast. The edge-detected image is cropped
to a circle so that no orientation of line has a disproportionate contribution
to the next step.

 Both corrections (the rotational correction between 0 and 90 degrees, and the
translational correction to put the corner of a square at the origin) are
applied to the image, and their effect stored in a matrix so we can
later recover the original position of the camera.
The image at left is an 80 degree counterclockwise rotation of the previous
image.